User Guide
To use the "Extended HTML Import Module", the user must be logged in as an Administrator. The HTML import dialog is shown by choosing the "Extended HTML Import" icon in the OpenCms Backoffice.
- Log in as Administrator
- Change to the "Administration" view
- Change to the "Offline" project
- Click the "Database Management" icon
- Select the "Extended HTML Import" icon

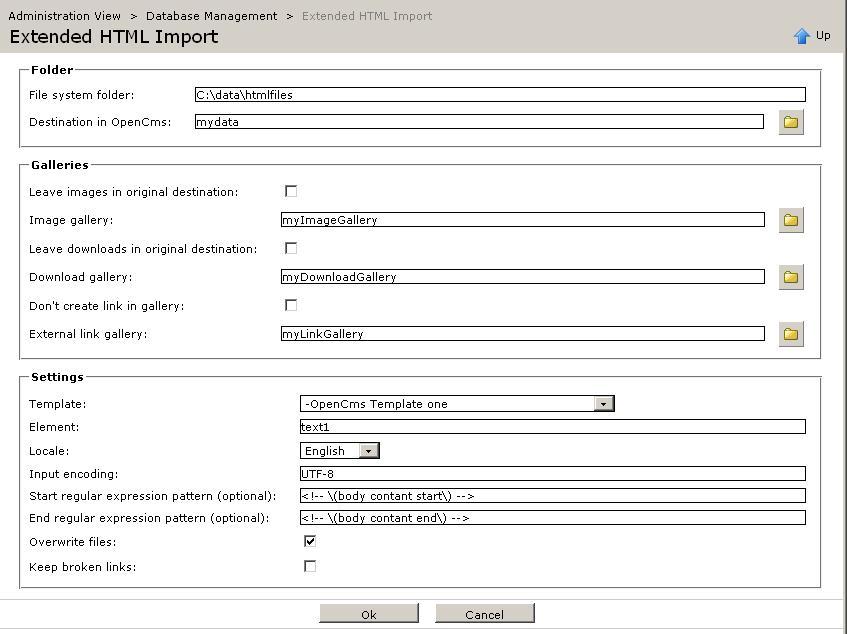
An input dialog form is displayed where all required import information has to be entered.

Explanation
-
File System Folder
This is the folder in the local file system where the files to be imported are stored. A full absolute path must be entered here (e.g.C:\data\htmlfiles). -
Destination in OpenCms
The destination in OpenCms to which the files are imported.
The path is to be seen from the currently active site in the workplace. The destination folder must already exist in OpenCms (e.g./mydata/). -
Leave images in original destination:
Checking this box will keep the images in their original location. Otherwise they will be moved to the Image Gallery defined below. -
Image Gallery:
The name of the image gallery in OpenCms (e.g.mypics). The gallery must already exist in the/system/galleries/pics/folder. -
Leave download in original destination:
Checking this box will keep downloads (e.g. .doc or .pdf files) in their original location. Otherwise they will be moved to the Download Gallery defined below. -
Download Gallery:
The name of the download gallery in OpenCms (e.g.mygallery). The gallery must already exist in the/system/galleries/download/folder. -
Don't create link in gallery:
Checking this box will keep external links as they are. Otherwise an external link file will be created in the External Link Gallery defined below. -
External Link Gallery:
The name of the external link gallery in OpenCms (e.g.mylinks). The gallery must already exist in the/system/galleries/externallinks/folder. - Template: A dropdown list with all available templates to use. The template selected here will be applied to all imported HTML pages.
- Element: The name of the content element of the template in OpenCms. The imported content will be stored in the specified element in OpenCms.
- Locale: A dropdown list with all available Locales to use. The content will be imported for the specified Locale.
- Input Encoding : This is the encoding used in the imported files. (e.g. UTF-8). A correct encoding must be entered here. If no encoding is entered, the encoding "ISO-8859-1" will be used. An invalid encoding can result in errors or missing characters after the import process, so the encoding must be chosen carefully.
-
Start regular expression pattern for content extraction (optional):
This field defines the start regular expression pattern for a content extraction during the import. Once a pattern is defined, all HTML contents will be parsed for the specified start and end pattern and extract the content between these patterns. You have to define the end pattern, too. -
End Pattern for content extraction (optional):
This field defines the end regular expression pattern for a content extraction during the import. -
Overwrite files:
If checked, existing files in the target folder and the gallery folders will be overwritten during the import without further confirmation. Before checking this option, be sure that no important resources are overwritten! -
Keep broken links:
If checked, broken links will not be modified. Otherweise, broken links will be set to "#"
Note: Optionally you can create a "meta.properties" file for each folder of
your import structure. This property file contains key/value pairs that set the OpenCms
properties of the imported folder in the "Virtual File System" (VFS) of OpenCms.
Example for a "meta.properties" file:
NavText=Folder

NavPos=1

myProperty=a comma \, separated \, value
Note: Use empty directories and galleries for an import. If the import would lead to conflicting filenames, the imported files will be renamed.
The import can be cancelled by clicking on the "Cancel" button of the input form.
After clicking the "OK" button, the directories, galleries, template and element entered
in the input form are validated. If one of them does not exist or is not valid, an error is
displayed and the input has to be corrected.

If the input was correct, the import starts and displays a progress report on the screen.
The following steps are done during the import process:
- Create an index of all files to be imported. In this step, the new filenames and link targets inside OpenCms are calculated. Links with no valid targets will not be modified.
- Import of all HTML files and folders, including content conversion and link modifications of the HTML/XHTML content. This step also collects the required information for steps 3 and 4, i.e. image alternative texts and external references.
- Import of all other resources (images, downloads) to the image and download galleries.
- Creation of all external links found during the content parsing process.
When the import is completed, the report can be reviewed. Click the "OK" Button to return to the administration view.

